Thursday, September 24, 2015

Pre germinated seeds

The results are in on my seed germinating experiment.

Rattlesnake beans had a 100% germination rate of the 8 seeds.

The Amish Pie Pumpkins had 3 of 4 seeds germinate though the one that didn't show a root was plump and in good condition so it may still germ in the garden.

The corn had less than half of the seeds germinate. I have a theory on why this is: my corn seeds were treated seeds and after some research I believe this may shorten the shelf life. I purchased the seeds in early 2013 which makes them almost 3yrs old. This really isn't a long time for seeds stored under good conditions, but with treated seeds I believe it is just too long. I planted all of the seeds just in case some needed an extra day to get going, but I don't have high hopes. I expect I will only see four new corn pop up in the garden. Since that is the case I'm going to go ahead and soak and plant all the rest of the Johnny's treated corn seeds. Once whatever of that sprouts, I'll plant my Burpee seeds (untreated) and see what happens.

This brings to light something I've been ignoring for a while. I really need to use up all the seeds I have ASAP as they are getting older. I'll try to empty out my seed box in the next couple seasons and start with entirely new seeds sometime next year.


Wednesday, September 23, 2015

Planted Banana Trees

I did it! I got my banana trees in the ground! Yes, yes, I know I said they'd be going in my yet to be built garden bed, but time and weather were not on my side, and, as it happens, another opportunity presented itself.

This is the side of my house that faces the main road. We extended the fence a couple years after we moved in so that it wrapped around the side of the shop and garage. I keep my compost bin in the corner on the other side of the fence and you can see my bamboo peaking over the top in the far back corner.

We used to keep the garbage and recycle bins in that dirt patch next to the house, but after a day of working outside and considering the aspect from the road, my husband suggested we keep them out of sight on the other side of the fence and landscape this little street-side corner to improve curb appeal. (The random hole in the wall the exhaust for the dryer.) We decided to plant the banana trees at an angle four feet of the fence so that the riding lawnmower could easily fit between the trees and fence. I'll be getting my cocoplums *hopefully* tomorrow and planting a hedge of them in that patch of dirt and in the back yard around the patio.

I think the banana trees will be quite happy here. This side of the house faces south and the fence faces east so the trees have a nice warm spot to grow while enjoying a bit of late afternoon shade from the fence. I plan on keeping the bananas to a very neat small stand, maybe just the mother trees and a pup tree each. I'll transplant the extra pups to my garden and maybe my zone 11 microclimate depending on how many pups there are.

My husband likes the look of grass growing straight up to the trunks of trees, and I like the look of a large landscaped bed. Since the bananas need lots of water and fertilizer and mulching, we compromised, and I dug out this little bed one day and planted the trees the next.

I removed all the grass and double dug the hole. I set aside half the excavated dirt and put in thick layer of nitrogen rich green manure using all the chopped bean plants. I laid the rest of the dirt in and then set the bananas in their spots. I filled in the rest of the bed with composted cow manure that my first batch of beans had been grown in along the back of the shop (should have a nice amount of nitrogen from the beans). I used a thick layer of grass clippings on top as mulch and have been pouring my leftover coffee and grounds around the trees to add some acidity to the soil. I'm also water in the trees daily for the first little while. Our soil is so sandy that it drains well and I'm not concerned about overwatering.

I just love the burgundy accents in the leaves and the lush tropical feel of the trees. As these and the cocoplums hedge mature, it should really dress up this corner of the house.


Tuesday, September 22, 2015

Garden Update 9/21/15

Cleaned out the bush bean/acre/field peas.

Turned them into a nice bucket of chopped green manure/mulch to be planted with the banana trees.

Left three little okra plants that have been heavily shaded and not able to compete with the beans. The cocoplum hedge will be going in this area in the next couple weeks. The okra have till then to prove themselves.

Left one bean plant in the ground because of the remarkable bean pod still on the vine. It is longer than most others, uniform in shape and with seed distributed the full length of the pod. This will be dried and saved as seed for the next season.

After heavy rain for the last week, I decided it was time to poke around in the garden to see what seeds need to be replanted and what may still sprout.

Very disappointed with the germination rate of the corn. Only 2 seeds out of ten have sprouted. I found one still in the ground that looks to have just germinated and is sending out the seed root. The others that I found were squishy and rotted. The rattlesnake beans fared a bit better though and I had roughly 16 of 21 seeds sprout. A couple of those look like they aren't gonna make it and make have been chewed on by something. Out of my 4 Amish pie pumpkin seeds, maybe one has sprouted. But it might be a cucumber. I'm not quite sure.

So I'm going to start seeds for each of those in a seed tray indoors using the wet paper towel method. I'd like to figure out if the corn seed is bad or just got flooded so I can plan my next move without wasting anymore time. I have a backup package of Burpee corn seed if my variety of seed from Johnny's is a flop. I suspect the heavy rain rotted the pumpkins and I just want a couple more pole beans.

This seed tray is a washed and repurposed cookie container from the grocery store. It will be perfect for seed starting and easier to look into than a ziplock bag.


Monday, September 21, 2015

DIY Fish Tank Filter Cartridges

AKA: Biodegradable Filter Cartridges or Compostable Filters for Freshwater Fish Tanks

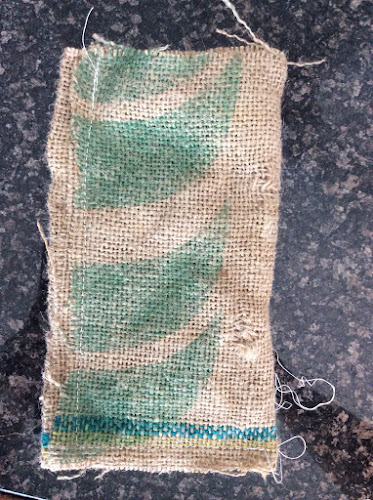
I've been making my own fish tank filter cartridges for over a year now with great results. I have made them with polyester batting, and they look exactly like what I could buy in the store. But I prefer to make them with natural materials so that I don't have to throw them away when I'm done.

The cartridges are filled with all sorts of bacteria goodness and fish waste that make a PERFECT food for plants, the compost bin, and your vermicompost bin. The red wiggler worms love burlap as a bedding material so by first using it as a filter cartridge, you are turning it into super yummy food and bedding: basically the best thing ever.

My worms eat up the used filter cartridges so fast! The burlap is partially decomposed from the beneficial bacteria in the fish tank and the water that the worms are able to utilize the filter cartridge much faster than any veggie scraps.

Even if you don't have a vermicompost bin, you could still toss them into a regular compost bin or just burry them right in your garden next to a heavy feeding plant like tomato, cucumber, squash or corn. You could even burry them in a pot for a houseplant to use as slow release fertilizer!

DIY Fish Tank Filter Cartridges: A Tutorial

Gather your supplies:

  • Burlap (can be an old coffee bag like I used or store bought burlap like the kind found at craft or hardware stores)
  • Cotton thread (any kind or color cotton thread, twine or jute if sewing by hand. You could even pull a long thread of the burlap fabric free and use that as your thread.)
  • Scissors
  • Activated Carbon
  • Sewing needle or sewing machine

1. First, determine how big your filter cartridge needs to be. I make make mine a little big and stuff it into the filter to give extra surface area to the beneficial bacteria. I have a Whisper filter made for 5-10 gallon tanks that has a store bought cartridge size of about 3"x5". I usually make my cartridges closer to 4"x8".


2.Cut your burlap into pieces that are double the width of your desired finished size. So, for my cartridges, I cut the burlap into 8"x8" squares.

3. Lay two squares on top of eachother, then fold the sandwich in half. Pin along two of the edges. This is where you will sew.

4. Back stitch, or knot the thread at the start, sew across one side, turn the corner and continue to sew the end of the second side. Back stitch or knot your thread.

5. Use a measuring spoon to scoop about 1 to 2 tablespoons of activated carbon into the middle of the bag. You should use more carbon if you have a larger tank.

6. Shake the carbon towards the bottom of the bag then sew the opening closed. I don't worry about frayed edges along the outside of the cartridge. As long as there are no pieces falling off and into the fish tank, the frayed edges are not problematic.


All done! I like to sew my cartridges assembly line style by cutting multiple pieces of burlap and making a half dozen or more at once. Look at all the fun colors! And these are so much cheaper to make than buying the premade kind. Rinse the filter well in water before placing it into the tank, just as you would a regular filter.

Please note: store bought cartridges often have a hard piece of plastic sandwiched between the layers. I do not worry about including it in my design though it could be easily done by skipping step 6 and using the plastic piece and clip to seal the top of the finished cartridge.

Also, I have $5 worth of goldfish and beta in my tank. I have used this design with live plants in the tank also with the same good results. While I have never had a problem in my tank, if you have a high end tank with sensitive fish, I recommend testing the water quality regularly to ensure safety for your fish.

You may also notice that it is necessary to change the filter one week or so sooner than you would a regular synthetic filter. This is because the burlap will eventually break down unlike polyester filters. This is a good thing and means that the filter is ready to become food for plants or worms.


Friday, September 18, 2015

Floridaprince Peach Tree

Isn't this tree just lovely!

I planted this Floridaprince Peach Tree dormant 10 months ago and it has thrived. It has grown at least two feet, branched out in every direction and is shaping in to a respectable tree. My husband bought it as a Christmas present for me from Rockledge Gardens (they are THE BEST).

All of the lighter brown wood is the new growth since planting.

And I have even seen two flowers! Maybe I'll get a couple peaches this summer.

I mulch it with cypress mulch and grass clippings and every two months with a hefty dose of vermicompost tea and vermicompost. When I change the water in my goldfish tank every month or so, the tree gets several gallons of the dirty water loaded with fish waste solids.

I finally got around to redoing the bricks around the tree this week. I have been meaning to do it for months so that I could use the original bricks to round out my hedge around the patio. I only had enough of the curved bricks to do one tree circle and they needed to go around the patio.

I took the opportunity to replace them with a double layer of bricks (the first row is below the grass line) to help keep our very aggressive grass in check. I also expanded the circle by about a foot total in diameter to make sure peach didn't receive any accidental hits from the weed whacker or lawnmower. I back-filled the extra space with rotting grass clippings to give the tree a nice nitrogen boost and encourage growth in the earthworm population I found while digging.

I was so thankful for my lovely limitation of keeping the peach tree solo when I was doing the back breaking work of digging out just a couple square feet of sod to put in the new bricks. If I had expanded the area to include a guild, I would have had yards of sod to remove, and, in my pregnant state, that would have been a miserable task. Yay for lovely limitations!

Here are the plants waiting to go into the new garden bed. I have two banana trees, two dwarf everbearing black mulberry bushes, dozens of sweet potato slips, and a handful of herbs in the tiny pots sitting on the chair. Sadly, my horsemint didn't seem to survive the transplant to a pot as you can see. I am, however, going to make a very strong "tea" with all the crunchy leaves and stems that will hopefully repel nematodes. Horsemint has the highest levels of thymol of any plant in the mint family and is used medicinally as a vermifuge. So here's hoping that works.

And check it out! I have sprouting seeds!

There are cucumbers, several varieties of sunflower and little rattlesnake pole beans all poking their seed leaves above ground. We've had rain for the last several days and today is the first real sunshine these seedlings have seen.

I used a couple rows of cotton string thumb tacked into the sides of the box to help mark the square feet of the bed. I also went along temporarily marked the width of the square feet with my acrylic quilting ruler. I just eyeballed the spacing and used a long edge of the ruler to press into the dirt to make the lines. It was quick and easy to do and quite effective. If I had transplants I wouldn't have worried about marking anything, but with the seeds I tend to forget where I have already planted. Once all my seedling are up, I'll remove the string to clean up the appearance of the boxes.


Thursday, September 17, 2015

Garden Plan E

Yep. Plan E. Always the winner.

This much erased and redrawn convoluted sketch is my master garden plan. I've decided to keep my new bed in an L shape but make the growing side 4ft wide instead of 2ft like I had originally planned way back when. By making that little change I'll double my growing space without having to buy extra wood or for any extra building work. I will however have to think through my planting design to make harvest simple. I'm small, so reaching more than 2.5ft into the garden is a bit challenging. But if I plant taller things in the back 12sqft (like trellised squash or corn), I will easily be able to reach over/between my picket fence to harvest. I could also plant root crops like carrots that are planted then left alone until harvest time. I'll keep my cut and come again veggies like lettuce towards the front for easy repeat harvest.

I'm excited to have the mulberries on the north side of the garden box where I'll be able to give them a couple more feet in the box and room to sprawl over the sides without crowding my veggies. The bananas will also be easy to care for there and will probably not shade out the veggies much. They actually may provide a bit of late afternoon shade to the a/c unit which would help it run more efficiently. Win win.

I am also going to use large pots for planting herbs and blueberry bushes which, surprisingly, do grow and produce really well here. Florida provides the first/earliest blueberry crop to the nation, in fact. There is even a small native blueberry growing wild locally which proves to me that the right variety will absolutely thrive. I'm going to be looking for the top three recommended varieties from the UF extension offices master list. They are: Emerald, Jewel and Flicker. According to my research, the plants produce best when cross pollinated.

I have a couple more ideas to maximize my growing space that will hopefully work out too. I'm really excited for this plan and all the potential that comes with it. I also like the idea of having some permanent trees and bushes in my garden to add year round beauty and aesthetic definition to the space.


Wednesday, September 16, 2015

And the design phase continues

So I presented the idea of the large mulched peach/mulberry/banana swing set area to my husband. He listened graciously and then offered some valid concerns like the kids climbing the fragile banana trees. He thought the design was pretty, but the effect wouldn't be in our smallish yard and that it would be too much mulch in relation to the size and amount of grass. As my favorite virtual mentor "the Nester" says, I now have a Lovely Limitation.

So I went back to the sketch pad last night and came up with this:

I really liked the idea of incorporating the bananas and bushes into my little garden and would still be able to guild them and give them lots of care inside my foot high raised bed. I would still be doubling my existing grow space too.

Unfortunately when I looked at the space from my kitchen window in the light of day and took my measuring tape to it, I realized that the roof has a generous 2ft overhang and only goes up about 10ft at the peak. My bananas will easily reach that high meaning the banana on the left next to the wall would be growing into the roof.

Darn. Back to the drawing board. Time for plan A, B, C, D...E! Yes, I think Plan E may be a winner. Now I just need a Plan E...

My husband made some suggestions about where I may incorporate the mulberries and banana trees into my garden or the existing landscaping.

1. In the above garden minding the roof and a 2ft setback from the A/C unit

Pros: I like that I'd get to see them from my kitchen window and have easy access to water and garden tools and freedom to "guild them" however I want. I could also reach the mulberries from all sides which would make pruning and fruit harvest easy.

Cons: I would probably loose a bit of growing space. The trees might shade other plants. This area is a bit shaded during most of the day but makes up for it with late day west sunlight (too much shade?)

2. In an existing landscaped area. This could be: in place of the bottlebrush in the far back corner and as the other foundation tree to round out my hedge. I was originally thinking of a palm or crape myrtle as the corner plant next to the hedge and the bottle brush is quite drought tolerant where it is.

Pros: the banana trees would be incorporated into the landscaping. I'm actually not sure why I care about this point?

Cons: I'd have to relocate the bottlebrush. I would not be able to guild the banana near the hedge. The banana where the bottlebrush is would take extra effort to water.

And then there's crazy option number 3 which currently looks like this:

This is the extension of the original fence along the north side of our house. The old gate to the backyard was where you see the two random fence posts near the corner of the house. This area is unused, out of sight, and basically a pain to maintain because the mower doesn't fit back there. I currently have some of the kids toys buried beneath the mountains of Spanish needle and weeds. I usually lean the kids pool against the house here during winter.

In spite of how it currently looks this site does actually have some pros: I could put the bananas and plant some sort of pretty guild here and mulch the whole 8ftx8ft square (anything would be better than what it currently is!) It is in an isolated area of the yard that gets full west sun (the camera angle shows how the sun hits the area). I'm pretty sure it is a zone 10 microclimate that would get nice and hot and humid which the bananas may thrive in.

Which leads me to a couple major drawbacks most of which center around the isolation of the area (it's a double edged sword): The bananas may get too hot here. I've never grown them before and I'm just not sure how hot is too hot especially with the majority of sun coming in from the west. It is also harder to water. It would be out of sight and I'd be less likely to remember to water it and fertilize it. There are a pack of hungry squirrels that like in the oak tree just to the other side of the fence and I'm afraid they'd ravish any fruit from any plant I put here because it's isolated.


Overall, I like the idea of option 1 the best. Fitting the trees and bushes into the garden would add beauty and make maintanence much much simpler. As I'll be having baby #4 in just a couple months, I need to make life easy for myself. However, I know that my banana trees will pup sometime in the next year and I'll have to do something with the pups. I may take that opportunity to try out the pups in option 3 and see how they do in the microclimate while the mom plants are safe in the garden. Also, it would be a fun little challenge, don't you think?


Tuesday, September 15, 2015

One more Guild Idea

We finally got the yard bushwhacked back to just about normal after over a month a neglect. As we all know, crap happens, and the back yard just didn't top the priority list. Or it did, but it was raining since this is the rainy season. Needless to say, our backyard was up to my hips and we could have easily lost children back there. People outside of FL just don't understand the maintenance required to keep a lawn from returning to its wild native field-like state. It took a couple hours and involved a riding lawnmower, a push mower, a couple rakes and a shovel, but, finally, we have a backyard again.

All that to say, I can show some picks of where the first guild will go. I was thinking about the peach guild again and am considering combining the peach and banana guild for two reasons. 1. (Maintanence) It would be less work to have only one guild (for now) to water, fertilize (naturally of course) and to mow/weed whack around. 2. (Aesthetics) It would look a bit more suburban and keep with the overall design of the backyard.

It is definitely simpler, but it may be a really good starting place.

As you can see, I probably overestimated the space between the swing set and the peach guild in my previous designs. Here is the tree with my baby bananas and mulberry bushes. You can where I went ahead and scorched the earth so to speak with my lawn mower in preparation for mulching under/around the swing set. I am sick to death of this area getting taken over by grass and weeds and wasps and wolf spiders moving in as a result. I have to check for wasps every single time they want to play on their set and then there is the constant weed whacking around the base of the swing set. Ain't nobody got time for that! So I'm laying weed block and mulching the area.

Since I'm mulching that area, why not go ahead and connect it with the peach guild so there is just one large thing to drive the mower around and weed whack every couple weeks. Would be much simpler to my thinking. And it would keep the yard more continuous instead of looking like there are a bajillion little mulch islands all over the place. And the bananas would grow fast and help screen out the neighbors behind us. All about privacy we are.

So this is the idea I'm going to present to the hubby and see what he thinks. We are a team after all, and he is the one who usually does the mowing and weed whacking.


Friday, September 11, 2015

For the Good of the Guild

Lately, I've been thinking about guilds. I've had plenty of time to research them and jot down ideas while I've been sick with a headcold the last several days. What's a guild you ask? It's something everyone has seen but maybe never noticed in detail. It's basically a micro ecosystem designed around plants. It's also a permaculture buzz word along with food forest, sustainable, and micro climate. Many people have done fantastic articles and video series on permaculture guilds. If you want an in depth look at all that jazz look up Geoff Lawton, check out the Permies forums and go from there.

But I like to keep things simple, and have found that I learn well by putting knowledge into my own words and taking notes. So, here is my little sketch of a guild.


Guilds occur in nature all by themselves and a forest, prairie, jungle, swamp are all just giant guilds. Permaculture backyard sized guilds consist of several different trees and plants working together in a mutually beneficial way. They require less outside input (water and fertilizer) and support beneficial insects and plants that outcompete the "bad bugs" (aphids, hornworms, etc) and undesirable weeds.

The main parts or layers, as I like to think of them, of a guild are these:

1. Tree Canopy

2. Tree Sub Canopy

3. Shrubs/Berries

4. Herbaceous/Insectors/Mulch

5. Ground Cover

6. Root Plants/Bulbs

7. Vines

8. Fungi


So, I'm going to pull from a list I'm working on to give an 8 part example to better illustrate the concept. A possible guild could be: 1. Oak Tree, 2. Japanese Maple Tree, 3. Gardenia, 4. Salvia, 5. Pothos, 6. Daffodils, 7. Honeysuckle, 8. Lichen.

Each plant in the example fits into the ecosystem as a whole and together they suppress weeds, create wildlife and insect habitat, conserve water by shading and covering the soil with dropped leaves and branches, and require similar light and soil and temperature conditions to grow. There are many many ways a tiny guild becomes its own ecosystem that is more self sufficient than a single plant by itself. Again I point to the expert Geoff Lawton for further instruction, and that's all I'll say in the way of explanation.

Why do I care about guilds? Because I bought two Dwarf Everbearing Black Mulberry bushes. Huh? My hobbies always start so innocuously :) So I've been on the hunt for a black mulberry bush/tree for about a year, but have not found any locally until Monday while I was at Lowes, of all places, browsing their selection of fruit bushes and trees. I had actually stopped in to look at Crape Myrtles which they didn't have. I usually find things I want when I'm not looking for them. So, I grabbed my two mulberry bushes and began considering where to put them. I wanted to do them in pots, but it gets so. stinking. hot. and sunny here that unless they are inside my house, potted plants tend to croak due to over heating and moisture loss or root rot during the rainy season. So, I knew I wanted to be able to walk all the way around the bushes wherever they ended up to make fruit harvest and pruning a breeze. This led me to the center on my backyard. And what is in the center-ish of my backyard? My Florida Prince Peach Tree (who is thriving and has a couple blossoms!!!) But would the berries and tree play nice together? I began to research. And I fell into days of reading about mutually beneficial plantings of trees, berries, herbs, vines and all the goodness of a food forest, but shrunken down into a tiny guild centered around one tree and the little bushes and plants to help support it. Like I said, it all begins so innocuously.

I emerged days later from my research and have sketched out a few different ideas for my peach/mulberry guild which are my two biggest concerns. I should also point out that the design HAS TO BE aesthetically pleasing in the overall landscape of my backyard and can't be left to its own devises like most natural food foresty type guild grow to look. They look wild people. Just wild. And my better half likes form more than function, beauty over utility, and sees beauty in clean lines and designated defined spaces. So I want my guilds (because I have now planned out three...cough, cough, Intervention please!) to be very structured and suburban landscape-ish.

The peach centric guilds with two different options (I'm leaning towards the second).

In the first photo, you can see that my bottlebrush tree told me he needs friends, and that I've caught a whim to purchase two banana trees because of fortuitous circumstances so they too will need a little tropical guild. I planned a second guild option for them also that I like better than the first.

Some of my considerations have been size, soil conditions, how they behave in my climate, ease and inexpensive of the plants, if they'll provide food, and what they'll bring to the landscape as a whole functionally and aesthetically. Basically, I've had lots of fun. I just LOVE the design phase.

Hopefully I'll be acquiring my banana trees tomorrow. It's pretty much tomorrow or never because of circumstances, so here's hoping!