Monday, March 26, 2012

Loving the Primaries


This Little Lovely is a Yellow Honey Dew Melon. I was in the produce section at Wal-Mart and this guy just spoke to me in keeping with the bright Primary colors trend of late. I couldn't help myself. And he was only $1.50. That was also cool. Boy, oh, Boy was it tasty! I threw it in the fridge when I got home and the hubby and I enjoyed it as a late night snack later. It had the consistency of  pear. A little crunchy and oh so sweet with a random tart bite here and there. Melons truly are my favorite fruit. Watermelons being the very tippy top of my list by a wide margin. Nothing, and I mean, nothing compares to a icy cool watermelon on a hot July afternoon. Common Watermelon Season!!!

Moving on...


 This is my Scalloped Curves Class quilt. Me and the boys had fun picking out the colors at the quilt shop. It is a baby size quilt, but I didn't need a quilt of that size at the moment (I know, blasphemy), but I did need a skirt around the vanity in my guest bathroom that's getting a facelift right now. Why am I redoing the bathroom that is actually painted and halfway decent when there is another bathroom in need of TLC, my boys bedroom that needs painting and decorating, AND finishing up the organizing in my Craft room all waiting for my attention??? I don't know. No Idea. Well, maybe this had something to do with it...


I had a gift certificate to the local quilt shop (!!!!) and after picking out all the prints for the quilt in my master bedroom, I had money leftover. So I snagged up some Animal Party Too that I have always loved and decided since the plumbing is now fixed (yay!!!) in my master bath, I could officially turn the guest bath into a fun place for the boys. Now that Wyatt is old enough to sit in the bathtub and play with Redding, the boys have spent MANY an hour splashing in the bubbles lately. And while I was sitting in there with them, the urge to fix it up overtook me. I was powerless to resist the call.
Just like I was powerless to not come home with 3yds of this fun flower print from Ikea on my birthday.


I can't wait to show you the full photos of what i used it for. It makes me happy. It's not a print I would have normally grabbed of the rack, but seeing it hanging in panels with the tree print (I'm kicking myself for not buying some of that) all over the store made me want to buy it. It looks so much better hanging than folded on a bolt.

And finally...


After making this for Wyatt, I just had to make one for Redding too with the leftover fabrics from his quilt. Tre Scrappy No? I used the para-cord that Alan bought for me at the army-navy surplus as the drawstring and some goofy red sparkly ancient Christmas fabric for the lining.


And because I got to this step of creating much too late at night, I was taken by the idea to do FMQ on the two panels of the bag thereby needing to sew it together with French seams. I don't know. I just don't know. In the end it worked out ok, and I squared of the bottom corners of the bag like a tote with a bitty 1" seam and tacked the resulting triangle excess down to the bottom of the bag.

I'll give it to Redding with a little something inside on Wyatt's birthday in April when I give Wyatt his bag. Why on Wyatt's birthday? Well, when we were little, Mom always got each of us a little present on our sister's (sisters'? sister's's? I have two sisters) birthday. It was nice to not feel forgotten while still enjoying celebrating a sister's birthday. I think I'll continue the tradition with our boys while they're young like Mom did for us. So, for a first, I already have some of the birthday presents ready A WHOLE MONTH in advance. I also got all the stuff for Easter baskets at the store yesterday. Mwhahahaha! I'm so on top of things right now!!! Don't worry. It won't last long. Those statements/thoughts tend to jinx me.

Funny story: While leaving the house yesterday, I was walking down my hall and turned to go into the kitchen. I wear glasses so I don't have a full range of vision. Case and Point. I turn to go into the kitchen and from beneath my glasses I see something large and black charge my feet. I know what this thing is even though I can't see it. It's another $)&%#$ &^$%&*( ROACH. As previously stated, I don't have little Roaches in my House. No. They are all BIG OLE 3" suckers. Tonight I saw a little one at about 2", but that's not the norm. So the thing charges me and I have been trying to wrangle children out the door and am already fit to be tied, I've got Wyatt on my hip and I start dancing because as you know, I've had these suckers run across my feet before, and It's just not pleasant. Redding starts laughing at me and telling me "mommom's so silly! It's a big ole (which sounds like bagel when he says it) bug!!!" Then I realize I have to kill it, so I start stomping around like made trying to see where it went, and I thought I got it, but because I was looking underneath the bottom rim of my glasses the floor is blurry, and I must've missed it. A furious search ensues, but the bugger escaped. I throw the kids in the car listening to Redding asking me "Mommom get the dead bug?" Bugs are referred to as dead in my house even if they're still alive, because it's only a matter of time before they're exterminated with a shoe.
Just like that 3" roach found out when he was waiting on the wall of my shower for me in Round 2. But my big strong shoe wielding Man was home then. HA HA! Dead Bug.

Friday, March 23, 2012

Perfectly Mitered Corners the Easy Way!


This is a little mug rug I made for the Scrap Attack Quilt Along. I used only scraps for it and some .5" double fold bias tape that I'll probably be using from now till eternity because I made a yard of fabric's worth of it. If anyone wants some, just let me know.

For my birthday Alan gave me this book, among many many other things (he's lavish with me <3). It is an excellent compendium for technique and quilt blocks. You just have to get past the pictures that were taken in the early 90's. The colors and fabrics were, well, very 90's. But I learned so much from the book that I highly recommend it for beginner level quilters. Or self taught quilters that may want some instruction in traditional and proper quilting methods.

In this book, I learned how to miter corners perfectly! And it's so easy. There's pretty much only one difference from other instructions, but I've found that it gives me a perfect amount of fabric and keeps things oh so nice and even on both sides. This method works with straight grain trim, or bias tape.

Step 1: Stop sewing 1/4" away from edge of corner with needle down (if you are using a 3/8" seam, stop 3/8" away, etc.).  


Step 2: Lift your presser foot and Rotate your fabric so that you are now on a 45 degree angle with the line you have just sewn. You should now be able to sew a line bisecting the corner. You don't have to backstitch, just sew right through the corner, and off your fabric.


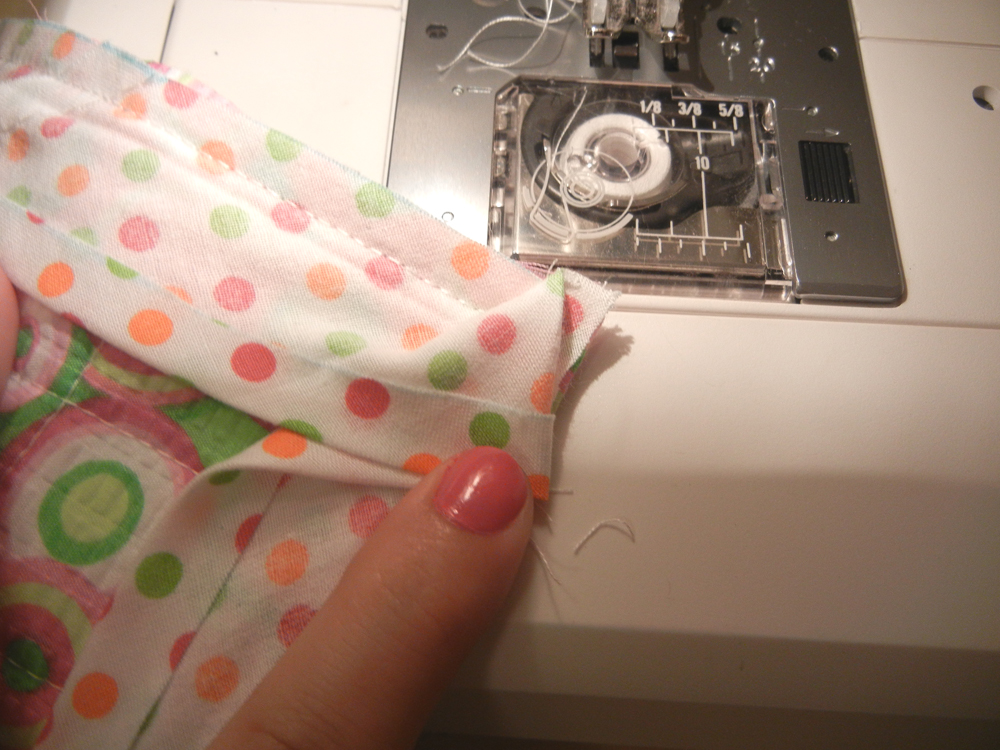
Lift your work, and pull it loose. You can clip your threads now, or leave them. I just leave them. It should look like this.


Step 3: Turn your work so that you are now read to sew the next side. Lift your trim, and using the angled line you have just sewn, lift your trim up and away, perpendicular to the side of your fabric where you just attached the trim.


Step 4: Fold your trim back down making the fold line set at the top edge of your fabric. Keep the trim lined up with itself and the edges of your fabric.


 Step 5: Begin sewing on your new side keeping with your seam allowances, and backstitch near the edge.


Your trim should be double layered like so. Repeat for all four sides.


Step 6: Turn your edges to begin attaching trim to the right side of the fabric.


Step 7: As you come up to a corner, stop with your needle down about an 1.5" or 2" from the edge. Pull your trim tight and straight with your finger.


Step 8: I like to use a straight pin as a guide to hold the fabric in place (don't pin it into the fabric, just use it to create a firm edge.) Fold your Fabric up...


Step 9: And pin in place. Sew up to the crease in the fabric (about where my pin is for me), with your needle down, lift your presser foot, and turn your fabric to begin sewing on the new side. No need to backstitch or anything.


And There You Are! A super easy Perfectly Mitered Corner! Step 2 is pretty much the only thing I've found different from other tutorials on mitering, but for me, it makes a HUGE difference. I've struggled to make my corners nice up until I used this method. The back always looked nice, but the front had too much fabric and just didn't look very crisp and the miter was usually crooked. Give it a try, and let me know what you think.

On this rug I used Straight grain double fold .5" tape and used a zig zag instead of a straight stitch. And it still looks mighty nice!


Happy Mitering!

Thursday, March 22, 2012

Making a Stuffed Animal Stuffed with Animals


Redding was given this big fun pillow pal animal lion dude for Christmas. A friend and I have been throwing around the idea of making bean bags stuffed with stuffed animals for a while, and I decided this was a perfect way to try out the idea without buying fabric. 


Start by marking with safety pins where you want your zipper to go based on how long your zip is.

 
 Begin ripping open your seam between the pins. My animal had this bias tape inside to support the seam. Work around it when ripping the seam and cut it out.


 Decide if you want to take the stuffing out of the feet or not. If so, cut out the middle bias tape and take out the stuffing. Leave the bias tape around the outer circle where the feet attach to the body. If you want the feet to stay stuffed, you'll need to sew in a scrap piece of fabric by attaching it to the bias tape.


Pin your zipper in place. It's a bit tricky because the seam is a curve, so be generous with your pinning. You may even need to adjust the placement as you sew.


Mark the end of your zipper and don't sew past your pins. Sew down the other side of your zipper.


I had this extra fabric from at the end of my zipper and the seam was loose on the animal from where I ripped it open to install the zip. So, You can either whipstitch this closed, or you can zig zag it.


I chose to zig zag at the top and bottom of my zipper going through the fabric and zipper to help support the seams. The dude needs all the help he can get. My boys are rough on their toys :)


And there ya are! I drew some new eyes on with a sharpie for this well loved dude.


And there he is stuffed full of all the smaller animals I could fit. He holds a surprising amount. I guess I should note that I didn't take the stuffing out of his head. The head was an entirely separately stuffed piece and attached with more bias tape, so I just left it alone.


Wyatt thinks lion is pretty cool now. 


An excellent floor cushion :) Project Stuffed Animal Stuffed Lion was a success.