Sunday, October 28, 2012

KCWC: Kimono PJ's

So after a storm of Etsy orders for me, many hours and several meetings about backyard chickens, a wedding my husband best manned for, one hurricane Sandy, and my old 95 civic finally giving up the ghost causing my husband to drive 4hr and an overnight stay to replace it--all in the last two weeks (oh, and the kids and me got colds somewhere in there)... I am finally getting around to my KCWC projects. I cut last night and sewed my little heart out today. I learned a bit more about making patterns and tried out a tut I've had on the to do list for forever and a day.

Here is the third and fourth pieces I made today. I'll post up about the first two "another day" (as Redding would say.)

I was inspired last year, well, that's not true exactly. I saw Rachel @ StitchedinColor make pajamas from Oliver + S bedtime story pajama pattern last Christmas. I thought they were every bit as awesome as everything else that woman creates, but the kimono look of the pattern didn't speak to me until now.

Have I ever told you I'm cheap? Yes. I am. And this little voice in my head says "Huh, I shouldn't buy that. I could make that myself." It speaks often and tells me lies, because replicas usually aren't as cool as the originals. But anyways. This was experience today, but the results still made me and Redding happy. And I know how to fix my pattern and not make the same obvious mistakes that came as a result of multi-tasking dividing my attention. Observe...

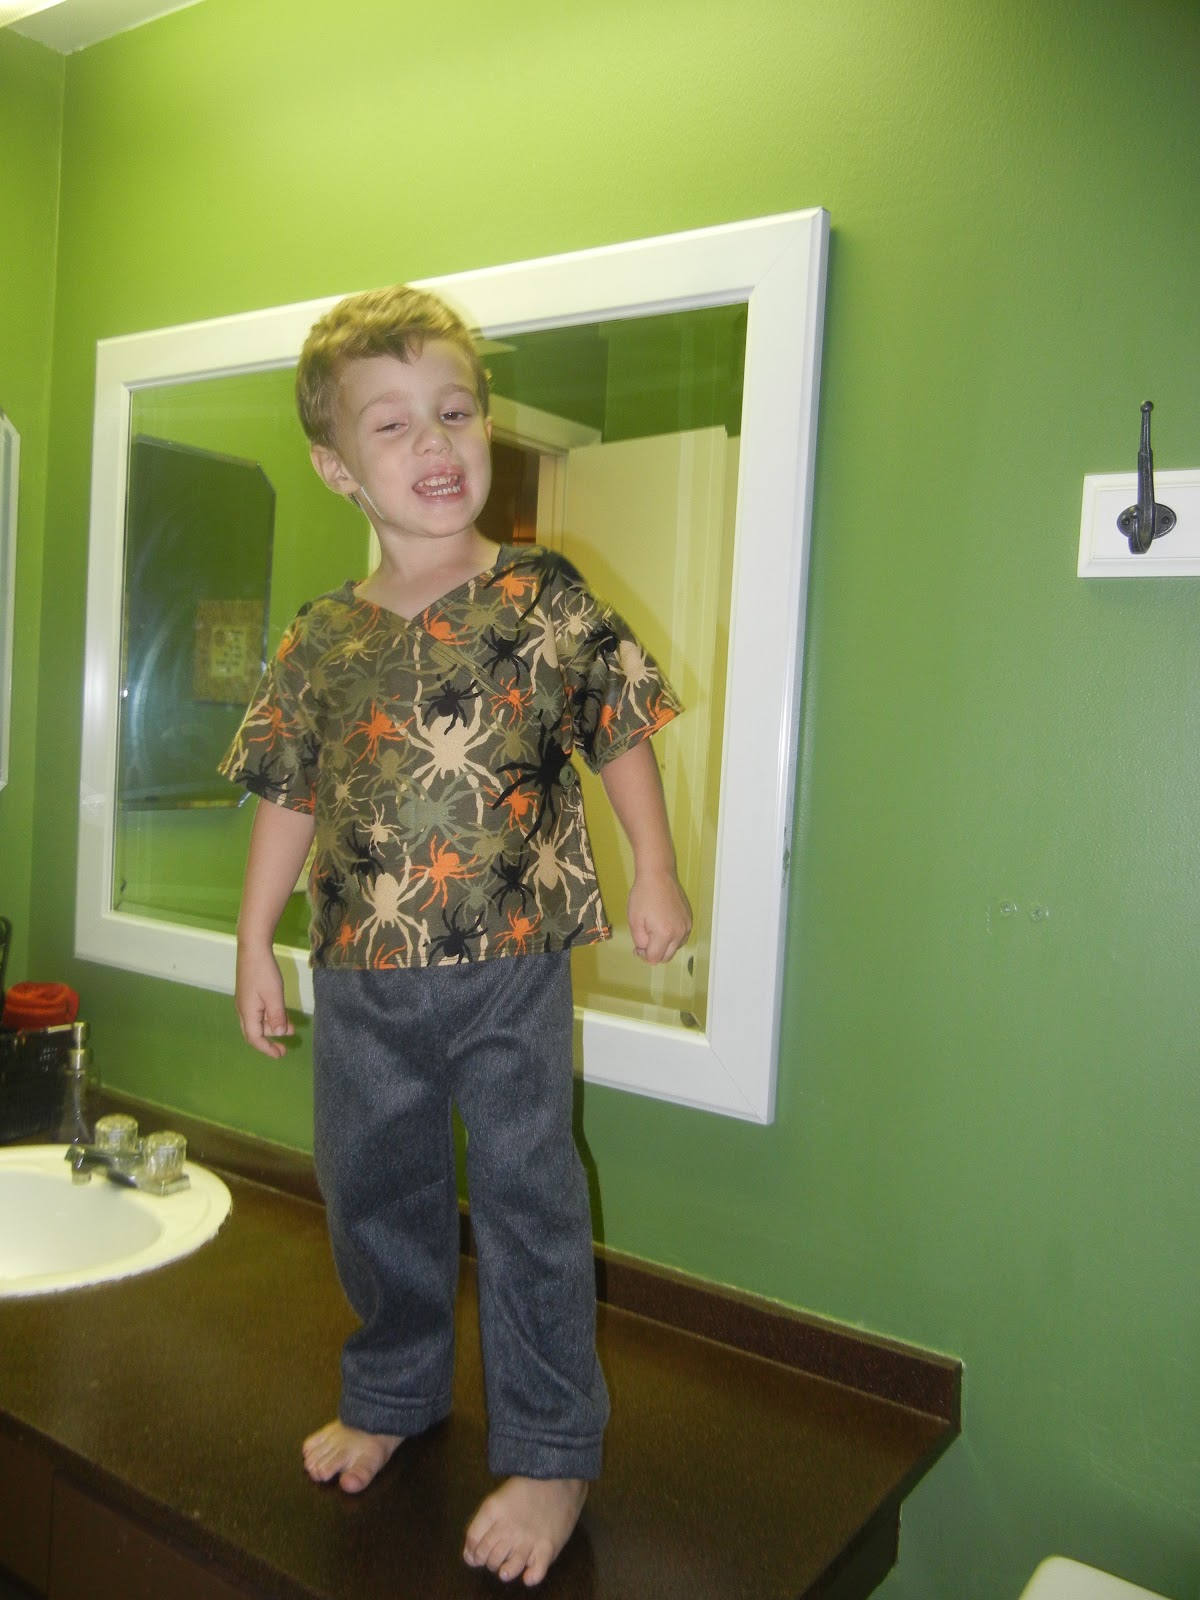
 Redding's Bedtime Story inspired Kimono PJ's


 I really like this flannel I bout from Joann's last year. It's sooo soft. It will pill after being washed 10x's, but lets not dwell. When I bought this, Redding had gotten bit (not a serious bite at all) by a spider on his hand while he was asleep and when we told him what the bite was from, he decided he was afraid of spiders. Actually, that might be a lie. I think that's why he was afraid, but maybe it was something else that made him scared. Anyways, he was scared, and I didn't want him to be. We cured his fear of grasshoppers by buying him a shirt at Goodwill (best find ever, brand new, with tags) by Babygap that had a diagram of a grasshopper on it and then he thought they were cool. So, spider fabric it was to try the trick again. Spiders really creep me out btw, but, I didn't tell him that. And he held the fabric like a blanket for a couple days, then didn't mind spiders anymore. He won't touch most bugs, spiders included, but he thinks they are cool to look at.
 

 The style of the shirt is an almost square back with a slight, and I mean slight, curve at the neck in and straight sleeves. Right angle sleeves I've heard them called. No curves in the armholes, just straight. I liked Rachel's look for her son using buttons, because Redding is currently learning how to do buttons and loves them on everything. I'm seriously going to make him a pillow with buttons and flaps all over it so he can sit contentedly and button away. But more of that later.
So buttons. Both are sewn to the inside panel with the buttonholes on the outer so he can see them and button them easily. He did it all by himself. My machine has an automatic buttonhole foot that I pulled out and bothered to learn how to use. And I don't want to ever go back to doing it myself again. The foot is a dream.
I also use the zig zag stitch on my machine with my presser feet lowered to sew the buttons on. Takes 2 seconds. Love it.
And That's the only things I did correctly for this pattern. Oh, I also like how the double stitching around all the edges and hems turned out. And topstitching the shoulders and arms to lie flat works great with this style of sleeve.

Now the list of what I'd do different:
  1. Take an inch off each side pattern piece to narrow the shirt from top to bottom. The shoulder are hanging off the kid. 
  2. Not forget to use Bias tape for the bias and neck edges. I got hem happy with my iron and double stitching. Forgot the bias tape.
  3. Make the inner edge of the shoulders wider so the shirt would hug his neck more. Had I not lost at least an inch with my hemming, this might not be a big deal, but still. I made it work by taking 3" triangles of grey fleece and zigzag stitching them on where I needed more fabric. It actually looks like a fun detail I meant to do all along. But you know different :) Wyatt sat in my lap while I sewed them on and he helped me push the fabric through. He was very sweet and wanted to help and was surprisingly compliant when I helped him do things. He really liked my up and down needle button.
  4. Not cut two right front panels. Apparently, in my groggy state, I was so entranced by my 49th viewing of Pride and Prejudice that I cut two right panels. I have no excuses. I even noted it on the pattern. But alas, I went to sew what should have been the left panel on and the wrong side of the fabric was facing out. Luckily I had one 5" wide strip leftover that covers the exposed part of that panel so it looks like I did it right. But, I didn't. You can see it very plainly when the full left panel is exposed and only half of it is double layered and the wrong side is showing on the other half.
I am really looking forward to trying this pattern again. With a few modifications (and more attention to one task at a time) it will be awesome.

To go with the top, I dug Redding's best fitting pair of pants out of the dirty clothes and made a pant pattern. Took my a while to draft it, and I compared it to another Mcall's pattern I had, but didn't care for the sizing of, to get the crotch and butt curves right. So here it is.

The Basic Pant


I have no regrets with this pattern whatsoever. It worked like a dream, sewed up in like 15min flat, and was easy peasy. The fabric is a lovely thick and soft heather grey fleece from Joann's that I bought to make a winter coat or something like that more than a yr ago, but began using for random projects. I had just enough to cut out the pants, and Redding says they are so good and nice. I will be using that pattern a hundred times more to make the kid some winter pants and with add pockets and probly skinny some up, and do stripes and knee patches. I talk big. Dream big. But follow-through, meh. We'll see. Oh, I should have either used a thinner elastic (I used a 1" ish size) or made the elastic casing in the waist roomier so the elastic doesn't roll over in parts. That's a pet peeve of mine usually, but the fleece is so thick, it doesn't matter in this pattern. They have a nice fit, but the fabric makes them look a tad strange as most sweat pants do. And Redding had a diaper on for bedtime, which isn't usually the case. Diapers make everything fit strangely. 

And that's the new PJ's and cool weather Pants! Sandy blew us in some nice winter weather. The low will be in the 50s and the high is 60s tomorrow. Yay!!! 

Redding insisted on you seeing his scraped "armbow" and silly face. So here ya go.


Wednesday, October 10, 2012

The Pumpkin Shirt

KCWC Fall 2012- the Pumpkin Shirt


Oct. 2012 120


 Redding has decided that he's in Love with Pumpkins. And Fall. And Holidays in general. So we made paper mache pumpkins and painted them. He thought that was very fun and then he asked for a pumpkin shirt. So last night, I was able to put one together. I was planning on painting the pumpkin on, but then I found in my old clothes stash, a FL Gators shirt with long orange sleeves. Happy Day! So I cut up one of the sleeves, used one of Alan's old black Tshirts, and snagged a small scrap of green for the stem.

Oct. 2012 123Oct. 2012 133

I used one of Redding's new shirts to trace the pattern for this shirt directly onto the black fabric and cut away. I'm happy to say I didn't use a single measuring tool for this entire project. It was fast, easy, and all free hand. Very liberating.

Oct. 2012 126

It wasn't my original intention to make the shirt a sleeveless style, so the arms are too long at the shoulders. But the weather is starting to cool off (It's only 83F outside right now!) and so I'm sure he'll be able to wear it over a long sleeve shirt and it will look fine.(Ignore the spots of oatmeal from breakfast.)

Oct. 2012 137

Redding really likes it and put it on as soon as he got up. I sewed the orange pumpkin on so that the edges will curl up around the stitching when it gets washed. The green stem should fray pretty well too.


Oct. 2012 128

Saturday, April 7, 2012

Messenger Bag


I made the adult sz Messenger Bag for this months LTTSA project. This is the last month for our group and I've had so much fun making things from the LTTS book and seeing the awesome creativity of the ladies in the group. I'm planning on giving this bag to my littlest sister as her last late Christmas present. What can I say. I'm a procrastinator. Trying to recover though :)

I learned from this project the importance of basting. When in doubt, baste. And then baste again. I think every curve and seam on this bag have at least 2 or 3 rows of stitches on them. But It made things come out very nicely and without any guesswork. I had a tiny bit of trouble understanding exactly what I was supposed to do when making the pleated front pocket, but once I started on it, I saw what was supposed to happen and only had to take out two seams on that part. That was the only challenging part of the project. The rest when surprisingly smoothly and nicely. I really like how it turned out and will probably make more of these in the future. Maybe a patchwork one.


The bag is a dark brown corduroy with chocolate, green, pink, off white striped bias binding and a fun flowery summery med weight home dec fabric for the lining. The pictures really don't do the vibrant colors justice. I used some bronze 2"ish metal rings to attach the shoulder strap to. I actually saved these from an old purse that was falling apart. It pays to upcycle. The strap is long enough to sit at my hip when slung over my shoulder and worn cross-shoulder style. It's pretty much awesome if I do say so myself. Hehe. Bought time I had a project work out right for me. Last week was one catastrophic failure after another. It was no fun. So I took a break from crafting and read a book or two, and then started up again. AND with a clean workroom nonetheless. Pics will be up this week! I can't wait to show you.

And Finally, A big thanks to Jessica our fearless leader for hosting this Little Things To Sew party over on her blog. It's been so much fun and I wish her the best of luck and creativeness as she competes in this season of Project Run & Play. It's been tons of fun :)

Wednesday, April 4, 2012

95 and Partly Cloudy

That's right folks. It is now 95F and Partly Cloudy outside and 79F inside with the A/C having run all day non stop. It is APRIL! That means it's gonna be a Hot hot summer. My tender little gardens don't stand a chance.


On the left are my little Heirloom Tomato Seedlings and on the right is mixed lettuces and herbs. I've been watering every other day and I'm now switching to everyday. We'll see how hardy these heirlooms really are.


Now this garden Alan made for me. Teehee :) It has a Palm of some sort and two Jatrophas. Both are heat loving arid types, so, this garden just might stand a chance.


It was Redding's idea to come play outside today. What he actually asked me was "Go outside and play in the mud?" Boys like mud. He insisted on wearing his smock today--not sure why.


Wyatt started splashing in the puddles on the patio while I was watering the flowers, so I just gave him the hose and he had at it.


I'm sitting cool in my tee and blue lightweight cotton gingham circle skirt I made two summers ago. Perfect for hot summer days.


Happy Spring!
 

Saturday, March 31, 2012

Whirly Gig Quilt Finish

Here are the promised grand finale photos of my Whirly Gig Quilt. This was my first quilt made with blocks instead of a piece as you go style, or in rows.


And I really like it.


The back is an old sheet that I cut into and put to good use. I quilted along the angle of the spokes of the whirly gig, but as you can see in the next picture, the angles aren't all going in the same way because I didn't follow the directions closely enough. But I'm not a perfectionist, so it doesn't overly bother me. 


I used what I think is a high loft polyester batting so I wasn't able to lay another layer of perpendicular quilting on without the fabrics bunching up. Oh well. I wanted to use it up so can now justify buying more batting and clean out the limited space available in my sewing room.


Here is a closeup of the fabrics I used. This photo does them justice. They looked so dainty and vintage style to me. I've always wanted to have a rose themed cottage style room, so while that won't be happening anytime soon, I couldn't resist these fabrics in the store.
The blocks all lined up exactly perfectly and that makes me quite giddy.


 And in other news...
Here is how the stain came out on my mirror. It was supposed to by ebony. Unfortunately, it just didn't take evenly. Alan suspects the previous varnish soaked in more than we thought, so we should have sanded the wood more deeply. In some spots it took quite well, but overall it has a tiger striped look to it. That would look good in the right room, but it's just not the look I was going for.


 So, If at first you don't succeed, try, try again. I'm gonna paint it black and sand it a bit till I get the look I want.

Thursday, March 29, 2012

My Bedroom Tour

Way back when,  I told you that I was buying shower curtains to use in my room and promised pics once the room was complete and happy. Well, I am finally getting around to it. Though I must admit, I still don't think of this room as "complete". Decorating is more of an ongoing process for me.


This is the view from the door. All neutral and happy yes? We have the Ikea Malm bedroom set that was our Christmas present in 2008 when we moved into the house. And we still love it! I'll admit, I wasn't sold on the pressed wood, particle board style furniture when we bought it because I wasn't sure how well it would last. Let me tell you, it is still in excellent shape.

It has even withstood these two demolition masters jumping and wresting on it every day. Redding may look innocent, but don't let him fool you for a second. He's the ringleader. Why just the other day, he came tearing through the living room pushing a wooden cart with Wyatt perched precariously on top. And then crashed into a mountain of toys. He's also taught Wyatt how to climb, and if Wyatt is having a hard time climbing somewhere, say, I dunno, The Couch, then Redding just grabs his hands and hoists him on up. Or hops down on the floor next to him and pushes Wyatt up by his rear. And then they somersault of the couch. Both intentionally, and unintentionally.


 Anyway,
I used a roll of brocade home decor fabric given to me to make window sized curtain liners that I hung on tension rods to go behind my curtains. We have an East facing room with the East window being 60" across. What the people were thinking when they designed certain things about my house, I have no Idea.

Over my dresser is going this sweet mirror that I found at Goodwill about a week ago. It's being refinished right now. More to come on that later.


This is a little garage sale shelf that I painted black and then white with a layer of crackle medium in between. The doily is one my Great Grandma made for me. 


 I think my husbands side of the room was messy this day (we take turns on having the messy side, but usually it's me) hence no photos. My mom was getting rid of these candle stick things at a garage sale we hosted the last month and I snagged them up. I painted them blue (they were like a dark walnut wood) and voila! That frame is where my Starbright mini quilt is going. With Christmas money this year, I bought us new sheets to replace the sadly torn one before, so I cut it up and crocheted it into that little white rug. I'll probably add onto it as more sheets get upcyled. The box on the floor just behind it is what I use instead of a nightstand. It holds all my current books, magazines, lotion, glasses case, that sort of thing.


And that's a little look at my room! Nothing too special, but very comfy and relaxing.

Wednesday, March 28, 2012

Scrappy Love

I have had so much fun over the last few months dreaming up and creating Scrappy Projects with the Festival of Scrappiness going on over at Stitched in Color. There have been so many cool and original projects and tutorials posted that are sure to inspire you. I have always wanted to try string piecing, so, for my first project I used blue and purple and pink and green scraps to build this log cabin style mini quilt. I started making it as a mug rug, but was having so much fun that I just kept building.


I quilted it in continuous wonky square starting at the center and working my way out. The back of the mini is more scrappy pieces and my polka dot bias binding.


This is my first mug rug. Ever. It was so much fun! So I made two more. This one was fairly random in my color choices. I built it in a wonky half log cabin style and pieced some of my smaller scraps just for fun.


I quilted it in the half log cabin shape starting at the opposite corner and working out. It looks pretty cool. 


I used some pink flower yardage to make .5" double fold straight grain binding that I zig zagged in place. Here is how I made those kickin mitered corners.


I am still lovin the Tutti Frutti collection that I've collected and all these scraps that came together for my second mug rug. I'm pretty sure I didn't have any plan when I started making this other than spreading the colors out.


I checker board quilted the mug rug with 1" squares and have decided that my walking foot is one of the best things ever. The fabric didn't pucker or bunch up like it has before whenever I've tried to quilt in overlapping patterns.


 This is my third mug rug that I whipped up using wonky tiny strips that I'd originally cut up to make little rag wreaths. But this was more fun. I quilted .5" diagonal lines and bound it with more pink flower tape and a scrap of white fabric for the back.


I redoing my bedroom right now with robin's egg blue, brown and tan. Above my bed I have two cute blue candle stick things with a framed generic picture between them. Since taking Curves class, I've had a hankerin to make some of these adorable mini wonky stars that were in one of our projects. I thought I would make several and then just fill in a background behind them using more neutral-ish scraps. But it just didn't want to come together. So, I called in my husband for back-up because he has a great eye for color, art, and design. After playing with my stars and fabric scraps, he decided that I should make my stars into flowers using some vine patterned fabric. I looked at my stars and thought, but they're stars! Never would I have thought of them as flowers. But he was right. He left the room to my huffing and "gosh darnit's" because once he threw me the idea, I just knew it would be awesome as most of his ideas are, but it would be more time consuming, as usual. But the things that take longer are the things that are usually worth doing.


So! Here is my Starbright Flower Garden! It's not quite finished yet, but I wanted to take a picture and send it in before the end of the contest and we were allowed to submit quilt tops. I'm going to do some applique style stitching that I've seen around blogdom lately and will post a little tut when it's all done.