Thursday, January 29, 2015

Cross Revive

Where it all started

Years ago, at least three, maybe even four, I had this crazy idea. I wanted to turn a couple Starbucks coffee bags into a clutch purse. I bought two bags of my favorite blend of coffee, Caffe Verona, and I liked the artwork on them so much that I wanted to do something unique and creative with them. So cleaned, cut stitched, and installed a zipper until, finally, I had done it! I carried my bag everywhere with me after that and smiled every time I saw it. Unexpectedly, I received complements on my little purse. So I made a few more and gave them to friends and family. Since then, my little Coffee Clutch has seen lots of wear and has come to be my cosmetics bag for traveling. The coffee bags make it nearly water proof and perfect for carrying my toiletries and protecting my clothes from accidental spills.

After all these years, I decided to offer my Original Coffee Clutch purses for sale on etsy. I'll post more tomorrow about my vision for our etsy store, Cross Revive, and some of the products we'll be designing. For now, check out some of the purses I've created.


Wednesday, January 28, 2015

Newspaper Seed Pots

I finally got on board with newspaper seed pots and I'm so glad I did! These pots are free, plantable, and small. They also a great with handling excess moisture and allowing air flow to the soil.

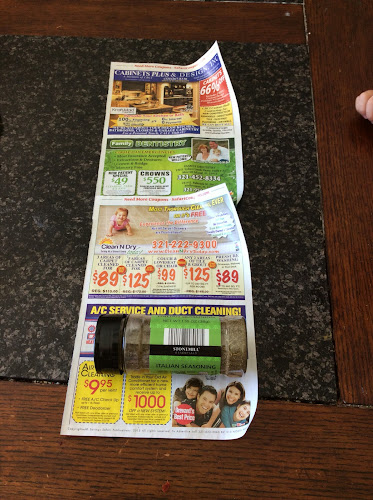
To start, get two sheets of paper, these are mail flyer size, about 8"x11". I prefer the newspaper type, but I didn't have any of that available so I used the slightly glossy kind. It is still biodegradable and works well, but newsprint is better.

You will need a large spice container to form your pot around. Roll the spice container in the middle of the paper and overlap the edges about an inch.

Next fold the bottom edges of the newspaper into the middle of the container in three parts. Start with the overlapped edge. Think of folding the paper around a roll of quarters. If your paper isn't very wide, you may need to scooch your spice container down to give you enough room to fold the edges in well.

Next push the spice container out using the edges you just folded in, and pinch around the edges to make the bottom sturdy. It should look like a tiny bowl on the bottom of the pot.

Now, pull the spice container out, and set the pot right side up. Starting with the overlapped edge, fold the edges of the paper inside the pot about an inch. Use your fingers to straighten out this fold.

For a really sturdy pot, repeat this step for a double folded edge. And you are all done!

Fill it with seed starting mix and plant away. I tuck my pots inside a makeshift greenhouse made from a clear Rubbermaid bin.


Tuesday, January 27, 2015

Cut-and-Come-Again Salads

I love fresh salads. The crisp crunch and complex flavor of just picked lettuce can't be beat. I like baby greens the best. Here in hot humid Central Florida, lettuce and greens tend to bolt very easily and become bitter and nearly inedible to my palate by the time the majority of the country is just planting their seeds. So for my garden, the best type of salads are the cut-and-come again kind. I can plant my first lettuce and green seeds at the end of October and a second set in December and these will carry me through the cold weather crop season.

This year I planted the last bit of my Summercrisp seeds and mixed lettuce pack I bought several years ago. Unfortunately we had a heavy rain just two days after planting, so most of my seeds were washed away. Thankfully, my beet seeds were larger and took root better, so I've been able to rely on baby beet greens for the majority of my salads.

These red stemmed plants are my beets. I've cut from these plants many times and have enough to make smoothies and salads a couple times a week. To harvest your lettuce and greens, go outside while the plants are still cool and not wilted by the sun.

Using your fingernails or scissors, cut the largest leaves and a good bit of the stem from the plant.

Be sure to leave a small leaf or two in the middle so the plant will grow back quickly. It may b important to note that if you cut your beet greens frequently, you may not get a harvestable beet root. So if you want a root, set aside some plants for roots and some for greens. You will, of course, be able to use the greens from your harvested beet root, but they may be more suitable for cooking than for salads.

Here is a little loose leaf lettuce plant I've already harvested from. You can see the old cut stems near the bottom of the plant from previous harvests. New leaves just keep popping out of the top!

And this is my handful of salad! My soil is quite sandy so I have to wash the leaves well to remove the grit. I like to wash them by floating the lot of them in a bowl of water and swishing them around. The sand falls right off and if there are any little bug on the leaves, they jump ship so as not to drown.

Chop up your washed leaves and any herbs you gathered while in the garden. Carrot stems can count an herb if you grow carrots. They taste like parsley.

This is my beautifully crafted, artisan cutting board made by my Great Uncle. He can work magic with wood. The attention to detail seen in the grain pattern and hue of the wood is remarkable. It makes the pattern look dimensional. His daughter sells them for him in an etsy shop if you'd like to own one yourself. I have two and leave one on the counter all the time because it's so pretty and handy to have nearby.

I was happy to be able to harvest my first tomato and snap pea to go on my salad. Fresh tomatoes taste like sunshine. I also threw on a couple chamomile flowers for beauty and a bit of sweetness.

And this is my finished lunch for today! My husband likes to eat his salads with salt, a lot of fresh ground black pepper and a drizzled with virgin olive oil. I still prefer a favorite dressing on mine.

However you top it, fresh salads are the best!


Monday, January 26, 2015

Hulk Smoothies

A.k.a. How I get my kids to eat raw spinach

We like smoothies. All the peeps in my house have milk sensitivities in some form, so smoothies are our alternative to ice cream. And snack. And breakfast. Sometimes lunch. You get the idea.

A friend got her boys to drink those suspicious looking green smoothies by calling them Hulk Juice. She's smart like that.

To start, get some fresh spinach. I grow Bromingdale Spinach and New Zealand Spinach in my garden. New Zealand Spinach is great because it self seeds and grows year round in central Florida. I just leave it wherever it sprouts in my garden and pluck leaves as needed. The name is misleading, however, as it is not really a spinach, but it does have a similar nutrient profile, thus the name.

The long leaves with magenta stems are beet greens. I like gathering all my greens in the baby stage because they are more tender and have no bitterness. If you don't have a garden, farmer's market or store bought is good too. So you have your spinach and have rinsed it. Fill up a blender cup with about 1 cup spinach, loosely packed. Then pour in a bit of almond milk, 1/2 cup should do, and send it for a blend. I blend the greens first because they seem to have a finer size that way.

Add one and a half frozen bananas. I buy my Almond milk ($2.79ish) and bananas ($.44/lb) from Aldi. I buy about 5lbs of bananas at a time, let them ripen, eat what we want and when they get a bit too ripe for our liking, I peel them and freeze them in a ziplock. So then pour more almond milk to fill your blender cup or however much to get the consistency you like. You can also add in all natural peanut butter or almond butter or flaxseed. Blend, and enjoy! I like to enjoy mine with a big smoothie straw. Little bendy straws drive me nuts.

Hulk Smoothies

Ingredients:

1 cup fresh spinach

About 1 cup almond milk

1 1/2 frozen bananas

Recipe:

Blend washed spinach and 1/2 cup almond milk till spinach is fine. Blend in bananas and rest of almond milk. Enjoy!


Friday, January 23, 2015

Adventures in Vermicomposting, Chapter 1

So back around Thanksgiving I placed an order for a starter size portion of Red Wiggler Worms. I was starting my very first vermicomposting bin. I couldn't justify spending $30 for a pound of worms, so I bought what I could afford which was a $10 snack bag ziplock bag full of compost with several red wigglers and many eggs. I had been shredding and saving paper for about a month and had what looked like enough to fill the Rubbermaid bin I chose. Of course dry paper is fluffy and could fill the bin, but worms need almost soggy paper bedding. So I filled a grocery bag with dry maple leaves from outside, crunched them, and mixed them in with my paper bedding and moistened it all once the worms arrived. I also threw in several handfuls of sandy dirt which, according to my research, the worms ingest into their gullet to help them grind food. I added the worms and fed them, and waited for the magic to happen. Now, about six weeks later, this is what I have.


My worm bin seems to be thriving. I have many large worms, medium worms, tiny white baby worms, and just today I was even fortunate enough to see two worms coupling. Further proof that things are moving along is the decomposition of the bedding and food scraps into worm castings.

Here in the center of this photo you can see two white baby worms. Being able to see the worms moving through the bin and see the layers of compost as they break it down without having to dig around in the bin is an added bonus of using a clear bin.


Now I'll tell you a little about why I chose the setup I did and how I keep it running. Disclaimer: I AM NOT AN EXPERT. I have done extensive research, however, I lack the practical experience to say with confidence that I know what I'm doing. Think of this as journal about my verm adventures. Here we go...

I chose my bin size mostly based on the space I had available to store it. In Central Florida in the summer, a verm bin would easily overheat in the garage and the worms couldn't survive outside for the same reason. So I keep my bin easily accessible in a dark, cool kitchen cabinet. I also knew I wanted a secure bin that would dissuade the occasional palmetto bug that found it's way inside our house from setting up shop in my bin, so I chose one with handle locks. I've heard that air circulation can be tricky to get enough of for the worms, but, at the same time, drilled holes can allow flying pests easy access or escape from the bin. So I cut the middle section of the box lid out and used duct tape to adhere a double layer of window screen to the opening.


Excess water pooling in the bottom of the bin is another commonly cited problem, especially in indoor Rubbermaid type bins. I wanted to be able to easily monitor the moisture content of the bin and decide to use a clear bin. I can pick up the bin and tip it to a corner and see if any water runs to that corner. Thus far, I haven't had any excess water. If I do, I plan to drill a hole near a bottom corner and stop it with a wine cork to allow me to drain the excess without having a gaping hole in my bin.


I feed the worms produce that has been frozen and thawed to room temperature about once a week. I do this for two reasons: 1) freezing kills any fruit fly eggs that may be on the produce skins-bananas are the most common culprit of fruit flies, and 2) it speeds up the decomposition of the produce meaning the worms can process it faster. I also give them used coffee grounds on the day I feed them. I have heard they like ph conditions to the slightly acidic side which coffee grounds help provide. I also mix in bedding on these days if need be. Added bedding in bin includes: shredded brown packing paper, newspaper, a bit of corrugated cardboard, crunched dry maple leaves, and dried grass clippings. I'm not concerned about adding the leaves or grass clippings because we don't use pesticide or herbicide on our lawn and neither do our closest neighbors. The worms seem to like this mix and live thought the whole bucket. Before adding new material in I fluff and mix what's already in the worm bin with a hand rake to help aerate the bedding and keep things from getting compacted, and to check on the decomposition of the previous weeks food.

This week I added quite a bit more bedding to offset the food in the bin. I shredded the bedding and left it in a bucket, then vacuumed the detritus from the gravel of my chemical free goldfish aquarium right into the bucket with the new bedding. I did this to moisten the bedding and because, according to my research, red wigglers aid in the breakdown of fish emulsion, and the emulsion brings bio diversity to the microorganisms within the worm bin. I used my hand rake to scoop the moistened bedding out or the fish waste bucket, held it in the air and let some of the excess water run off, then put it on top of the verm bin and fluffed it up a bit. That was about three days ago, and today I saw more baby worms and the breeding worms very near the top of the box right under the fish-waste-soaked bedding. So I'd call that decision a successful one!


Thus concludes Ch 1 of Adventures in Vermicomposting!


Thursday, January 22, 2015

Let the weeds be

I like weeds. In fact, I can't imagine my yard without them. Without "weeds," there would be none of this...

See. Weeds are lovely. This three leaf clover and the trumpet shaped purple flowers are called Oxalis. It's an escaped plant that can be found in part shade most of the year in Central Florida. This is my favorite little weed, and, in fact, you've probably seen the purple leafed variety at garden stores. It spreads and grows from small bulbs a couple inches down in sandy, well drained soil. I can't imagine a perfectly manicured lawn for me. I love taking a stroll through the yard and seeing what seasonal plants have popped up.

I incorporated a few sprigs of purple and white varieties of Sweet Alyssum into my vase along with the Oxalis. I just love this little ground cover plant. It smells just like honey, and bees love it.

So for now, if you see a weed, let it be and enjoy the variety it brings. Except for Spanish Needles. That stuff is the worst ;)


Wednesday, January 21, 2015

Happy New Year 2015

Happy New Year!

This morning I'm taking my coffee in my little garden. I've begun work to consolidate my growing areas to this sweet little area and this is what I have so far. It's a lovely little salad garden right now and filled with carrots, beets, sugar snap peas, collards, lettuce, and radishes along with some baskets of my favorite herbs.


I've planted some Sweet Alyssum to boarder one side of my garden. I just love it! Oh, it smells exactly like honey.


The sugar snap peas are blooming and my little red romaine lettuce is starting to take off.


And since it's a bit cool, I have my tomatoes and 2nd year peppers in pots on the west side of the house in full sun.


Looking forward to another adventurous year in homemaking!