Friday, February 13, 2015

Progress isn't always pretty

After removing the palm from the garden area, I had to rework the garden layout a bit. Which also involved figuring out the best way to deal with the downspout from the corner gutter. It hits about two feet away from the wall and right next to the patio. If I just let it empty right on top of the garden, the water would absolutely wash the garden away. We get some pretty heavy rain and storms in the summer.

So instead of thinking of the excess water as a problem, I really wanted to think of it as an asset. First thought was a rain barrel. But after researching, I realized that it wouldn't be the answer to my problems for three reasons: cost (even for diy it can be pricey), volume, and water pressure. So I began thinking about making some sort of French drain right down the center of the garden with a gutter and rocks. It was a good idea and would probably work, but then I did more research and got to the "root" of things. I plan on turning my raised bed into a rain garden.

Figure A Rain Garden Details


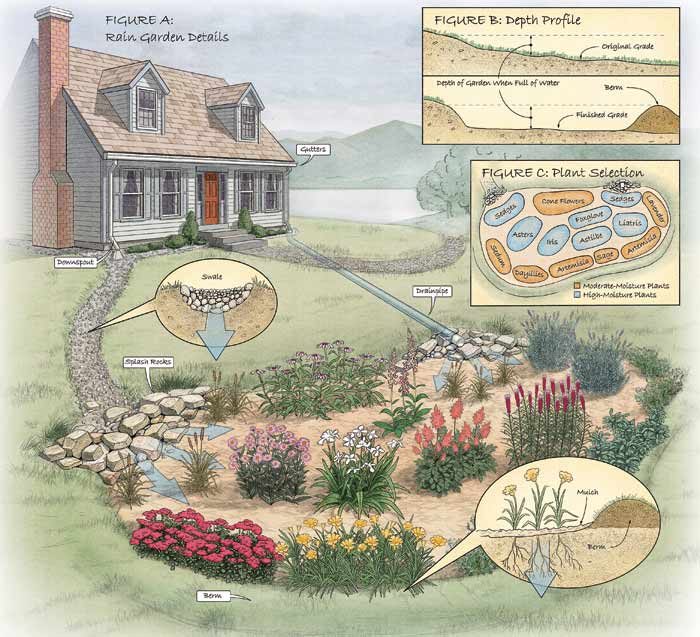
These types of gardens are strategically planted and used to keep water runoff from roofs from going into storm drains. Think of it like a bog. During a hard rain, the water would be routed to this bog garden where the water would collect until it is eventually absorbed by the plants and the rest slowly drains into the soil. In Florida, we call large scale ones of these "retention ponds." Alligators love them.

I am in somewhat of a unique position to be able to create this because my entire yard is made of sand. It is like 80% sand. Water drains through sand FAST. So I'm not concerned about my garden flooding, but I do want it to be able to soak up all this water before it soaks down below the root line. The magic words here are "organic matter". It holds an immense amount of water and nourishes the plants. This can be compost, manure, wood, hay etc.

I just happen to have four bales of hay sitting in the corner of my yard just rotting away begging to be used. We had them as photo props from our portraits in December.

I planned for the garden bed to be a 10ft x 6ft L shape with a 3ft width. The first step was to dig bout two feet down and make a pond shape that was sloped slightly away from the house and to the outer points of the L.

As my children can prove, it's a pretty deep trench.

I then checked the grading to make sure water would, in fact, move howi wanted it to in this area. I turned the hose on full blast with my garden wand attached and let it run for about five minutes and used the water to even out sides of the "pond." Watching this giant mud puddle forming and not being able to jump into it was the hardest thing my kids have had to do this month for sure. The water drained from here fairly quickly once the hose was shut off.

That done, I threw what little yard debris I had, mostly dry crunchy palm fronds, into the trench. I LOVE the idea of hugelkultur, but my yard is seriously lacking in the wood department. Next, I dragged a bale of hay over and tossed it with my metal rake until it was all loosened and filled the garden.

I pulled the smaller pile of dirt on top and it compressed the hay down to just below the level of the concrete.

I've made a lot of progress in the last two days, but it hasn't been pretty. In fact it hasn't helped the overall appearance of the yard much at all. But I know that progress has been made, and that's enough for now.

-------Since writing this post, I was able to source some local horse manure and added a layer of it about an inch or two deep all over the whole bed. I layered another couple inches of dirt on top of that, then tossed a several inch layer of hay, another inch of dirt, another layer of hay, and another several inches of dirt which was the last of the dirt on the patio. I cleaned out my other garden bed and put some green manure of snap pea vines and New Zealand spinach on top of the bed. I'm hoping to get to cedar to begin construction the bed today.


Thursday, February 12, 2015

Rethinking the Palm

Yesterday, I carefully looked at my Spindle Palm tree and realized that the roots seemed to be going too close to the foundation and that the next set of leaves it sent up (which are already shooting up) would put it right into the eaves of the house. And I'm betting the palm would win the fight against my roof. So I made the executive decision to move it to be the corner of my patio viburnum hedge. The next 2 hours of work were spent prepping its new home and the really long hard part was spent removing the stinker. I will tell you what. That dude didn't want to budge. It took me and Redding and Wyatt to finally tip it out of its hole, then Redding had to stand on the shovel to create a fulcrum by which I could get it high enough to drag it up and onto the patio. The base of this tree was so heavy I couldn't lift it. And I don't bench press, by I carry around a 18lb baby all the live-long-day and throw bags of mulch like nothing. So what I'm saying is that bad boy was HEAVY! Anyways, tada!

It may not look like much in this picture, but sitting at that table, I can really see the bones of the landscaping coming together.


Tuesday, February 10, 2015

Garden Update 2/10/15

The peas are really coming along nicely. Since I tied them up to a bamboo pole they have shot up and started producing. They couldn't climb the 1" pole by themselves so I used some cotton string to bunch the whole lot together and lift them up to the pole. That was all the help they needed.

This is from, I think, my second batch of seeds. These are peppers, eggplant, and tomatoes. Some of these will go to my dads garden as soon as they're grown out enough.
 

All these close up shots look nice enough, but let me be honest and give you the full picture of what I'm working with.

I have my work cut out for me before I can call this backyard finished. I'll give you a little tour of what I plan to do. Right in the middle of this photo is my Floridaprince peach tree. It was one of the only things I asked for for Christmas and my love bought it for me. That's love :) Anyway, on the left of the patio I have a sweet viburnum hedge started. I'm going to continue that hedge to 2/3 thirds of the way around the patio, about to where the doors are and I will outline it with red brick edging and mulch. Of course everything is in need of a general pressure washing and the back of the house will be stuccoed and painted. A variegated Aribicola hedge will go behind the palm. I will also put in a conversation piece Azaela hedge in the shaded side of the AC unit and under the overhang where the mower is. A 3'x6' cedar raised garden will be in front of the Palm to the edge of the AC unit. The L shaped raised bed will be remade with cedar and turned into a U shaped bed with a 6'x8' outline. Between these two beds I will have 58 sqft of growing space. I want to hang a window box under the kitchen window and a hanging plant shelf on the wall where the mower is parked. On the back side of the shop (the building with the vinyl siding), I will be cleaning that area up and planting a tall hedge of some kind. We don't use that door and would like to simply hide it and make it inaccessible. The tall wood box on the same side is my outdoor compost bin and I still have to paint it and make the lid for the bin. In the far right corner of the yard, I may put my two firebush plants. They're rather unruly and need some space.

So there you have it! Now if only I had unlimited resources I could have this done tomorrow. But that's not how things work. So for now, I will just keep on keeping on.


Thursday, February 5, 2015

Adventures in Vermicomposting, Ch 2

While digging around in the worm bin today, I noticed fewer worms to the top of the bin. I kept digging and found them gathered near the bottom of the bin which seemed too wet to me, and also had a bit of rotting odor. I couldn't find anything obviously wrong, but I did note that things were a bit compacted and there were castings through the whole box. There was also very little identifiable food scraps and no identifiable paper bedding, mostly just castings, grass clippings, and crunched leaves. Well then, I had only one idea: my very industrious worms had worked their way through all the food and bedding I'd offered and were in need of fresh food and bedding. It still seems a little crazy to me to think that after only two months my starter colony have composted an entire box of materials, but maybe they have. (If you are a veteran worm owner, please throw in your two cents here, I'm very curious.) This is what it looks like.

Just in case that's true, I turned and aerated the compost, and scooched it all to one half of the box leaving a whole corner empty.

I made a trip outside to the recycle bin and pulled a couple newspaper flyers and a small corrugated cardboard box out then tore them up into appropriately sized pieces. I was already in the process of a water vacuum and change for the goldfish, so, once again, I used the dirty water to wet most of the new bedding.

I put some dry cardboard pieces in the bottom to soak up any excess moisture, then layered in the wet bedding, some produce scraps and used coffee grounds, another layer of wet bedding, the old filter from my fish tank (this part is an experiment to see if the worms find anything edible on the filter and since it's loaded with good microorganisms, I figured, why not), another layer of wet bedding, a thin layer of dry bedding and some more used coffee grounds on top for good measure. I figure, this way, if the worms migrate to the fresh side of the bin, they must be done with the old side and I can begin removing the vermicompost.

You see, I want this colony to GROW! My crazy, wild, ambitious hope is that one day, in the not so distant future, I'll be able to move my starter colony that has outgrown its bin to a Worm Inn Mega. Then, I'll be able to vermicompost 100% of my kitchen scraps and maybe my neighbors too, and maybe even some spoiled produce from the supermarket! It's overly ambitious I know. But dreaming about the big stuff motivates me to do the little stuff really well. Anyways, I'll keep you posted!

Update 2/6/14:

Tonight I checked my worm bin and found the smell to be even worse and there was several ounces of water that pooled in a corner when I checked it. The worms were also not in any of the fresh bedding, not even near it. So, I poured off the excess and then dumped all the contents of the bin into a bucket several times larger so I could give the bin a good look see. I found the bedding to be too wet and there were very few springtails and only saw a dozen or so worms. There were lots of the tiny white worms though. Further research has led me to believe that 1) the bedding was too wet [a recent problem], 2) the white worms are called pot worms and their presence indicates that, 3) the bin is too acidic [probably a result of too many coffee grounds.]

Somewhere, can't remember where, I read that red wigglers like an environment that is to the acidic range of the ph scale. I have just learned that is unequivocally NOT TRUE. They like the middle to very slightly alkaline side of the scale.

To solve these problems, I have already added and mixed in a good bit of dry newspaper. I am about to go boil a bunch of eggs so I can use the calcium that composes the eggshells to raise the ph of the bed. I plan on boiling the eggs, drying the shells and pulverizing them to a powder then mixing them in with the bedding. Tomorrow, I'll check to make sure there is no excess moisture, and then I will leave my worms alone for a week to allow them to recover from all this handling. Next weekend, I will feed them some aged scraps that's been run through the food processor, top it off with some dry bedding and then leave the poor things alone for two more weeks. So, I hope to report back in about a month that the worms are happy and healthy.


Monday, February 2, 2015

Cross Revive: Reclaiming Materials

Part of the inspiration for my new etsy store was to be able to use mainly reclaimed materials for the products. I truly enjoy seeing the potential in things that are no longer treasured or useful, then working with the raw materials until they have become something good and desirable again.

I saw the potential in the genuine suede leather and 100% wool tags of these garments. The feel and drape of the leather is so nice. But I wanted to start with something more familiar and something I had the right sewing machine needles for. So I pulled the plaid skirt for my first work. It may not show in the pictures, but trust me, the red of this skirt is so dark and rich and everything you hope to see in a nice tartan plaid.

The buckles on this skirt also spoke to me. And then began the deconstruction process. This part can take minutes to hours depending on the piece and how many seems I decide to pull out. In this case, I liked the fabric so much that I removed every. single. pleat. But it was well worth the effort.

Two things led me to decide what I wanted to make with this skirt. The first was quite simple: desire. My husband bought me an iPad mini to run my etsy store from and to replace my crashed computer. And by the way, it's awesome. He knows his stuff my husband. He also got me a smart case to help protect it from me and the kids. But I still wanted a sleeve of some kind to go around it and protect it that much more. And so I decided to make a sleeve.

The second deciding factor was that I saw room in the market for quality, reasonably priced iPad covers geared towards men. My cousin makes great quality tablet sleeves and accessories in beautiful colors and designs for women. I hope to be able to offer a similar product in reclaimed materials for men. The first cover I created, I kept for myself. This is the second.

It is a top open sleeve with a flap to protect all sides of the tablet. I installed a belt buckle closure to keep the iPad secure. The sleeve is fully padded in a stiff material between the layers of wool.

I double stitched every seem to ensure the sleeve will last for a long time. The sleeve fits an iPad mini with or with out a Smart Case or Smart Cover. The fit is snug to protect your iPad.

I matched the pattern of the plaid so that it lines up neatly on the outside. If you'd like to purchase this sleeve, you can find it in my etsy store. I have another buckle and enough fabric to make one more cover in the tablet size of your choice should you like a custom sized cover.

Thank you for taking a moment to read about and support my work. I'll continue to post about my new creations as I make them, and hopefully there will be some new products this week.